Why Solar Panel Maintenance Matters More Than You Think
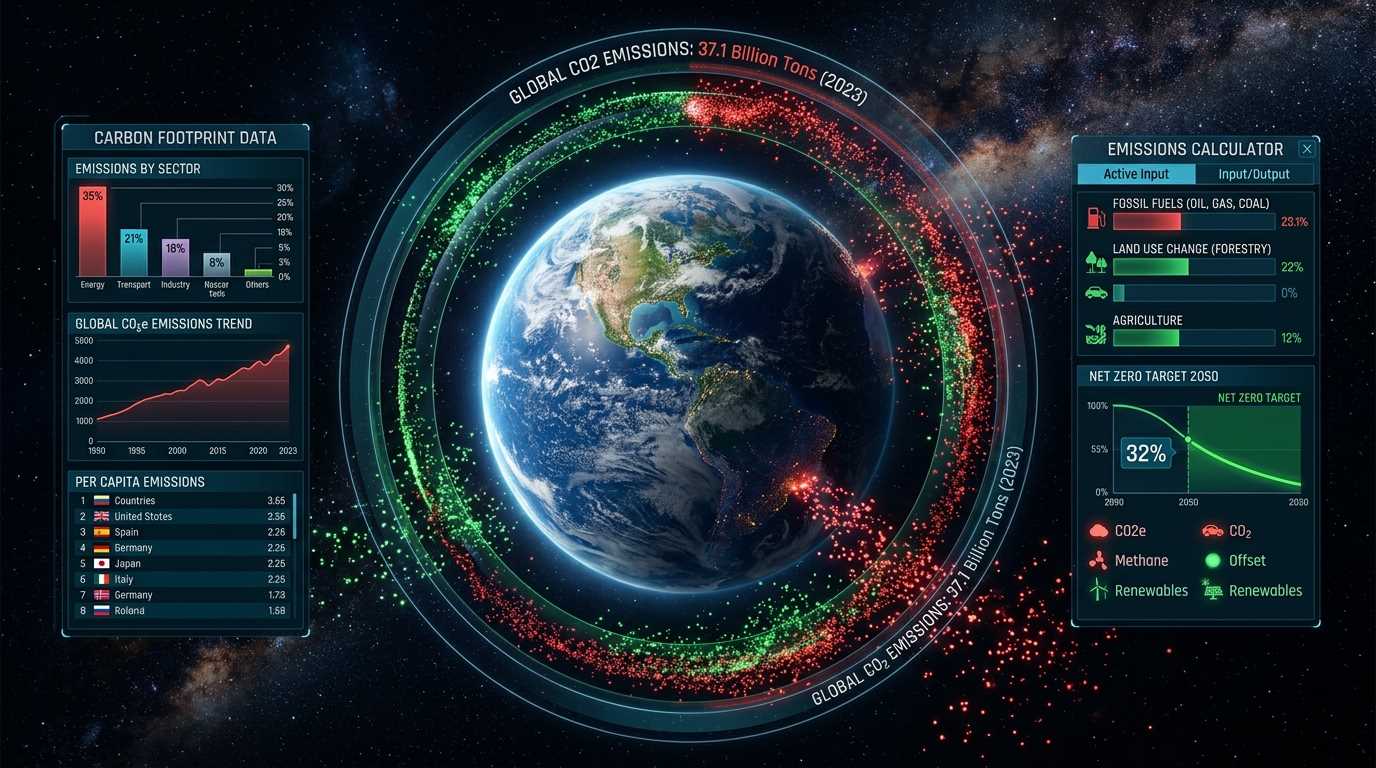
Solar panels are famously low-maintenance — they have no moving parts, weather-resistant frames, and 25-year warranties. But "low-maintenance" doesn't mean "no maintenance." Studies from the National Renewable Energy Laboratory show that dirty or unmaintained panels lose 5-25% of their output depending on your environment. For a 7 kW system producing $1,800/year in savings, that's $90-$450 in lost value annually. Use a solar panel output calculator to estimate your expected production.
I've been monitoring my own 8.4 kW residential solar installation since 2019, and I can tell you from experience: a 30-minute quarterly inspection and an annual cleaning keep my panels producing within 2-3% of their NREL PVWatts estimates. Meanwhile, neighbors who never touch their panels see production drift 10-15% below projections. The difference isn't panel quality — it's maintenance habits.
Spring: Cleaning and Post-Winter Inspection
Spring is the most important maintenance season. Winter leaves behind pollen, dust, bird droppings, and sometimes mineral deposits from melting snow or hard water runoff. Each of these creates a thin film on your panels that blocks sunlight.
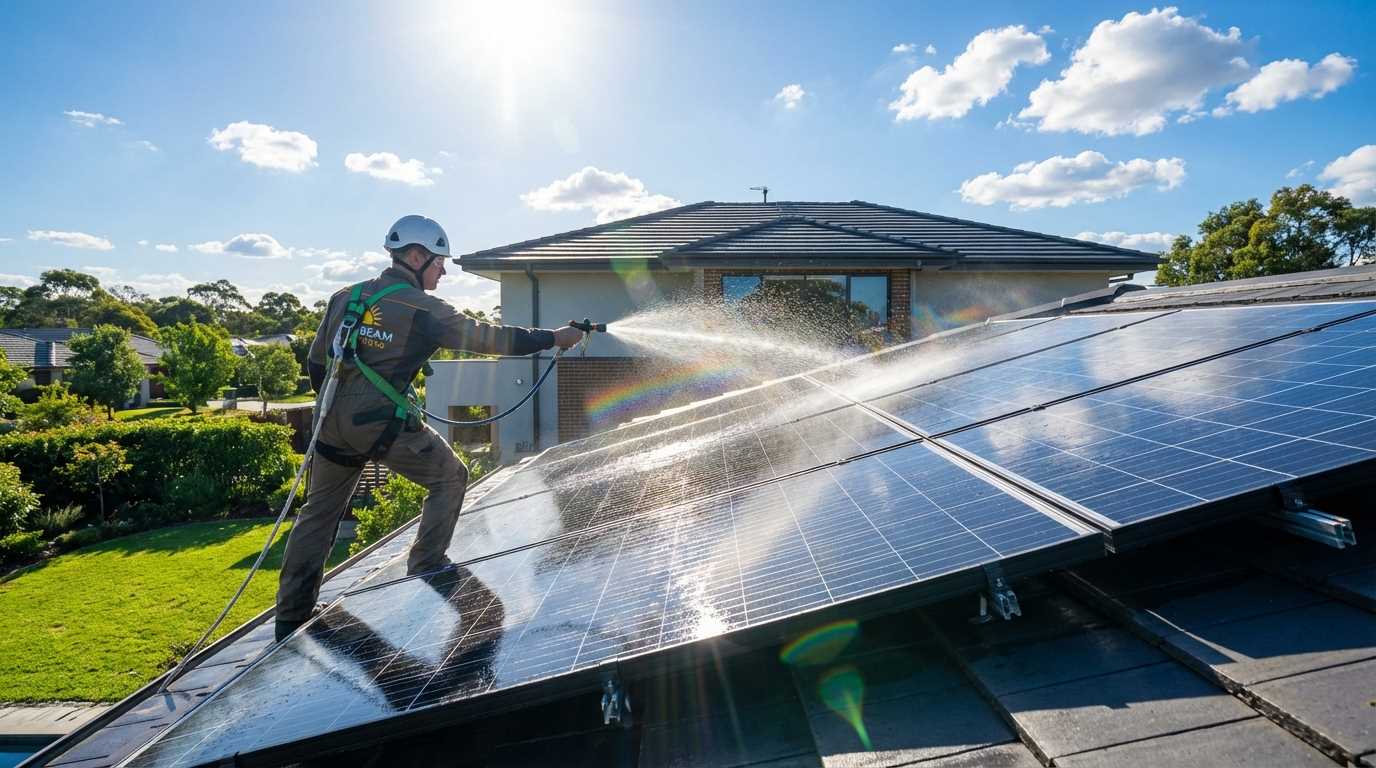
Cleaning procedure: Use a garden hose with a soft brush attachment. Spray from ground level if possible — climbing onto your roof is rarely necessary and creates safety risks. If water alone doesn't remove the buildup, use a mild soap solution (dish soap diluted 1:100 in water). Never use abrasive cleaners, pressure washers, or metal scrapers — these scratch the anti-reflective coating and permanently reduce output. Clean on a cool morning or evening; cleaning hot panels in direct sun can cause thermal shock and micro-cracks in the glass.
Visual inspection: Walk around your system and check for cracked panels, loose mounting hardware, corroded wiring connections, and vegetation growth that may be shading panels. Even a single shaded panel in a string can reduce the entire string's output by 20-40%.
Summer: Performance Monitoring and Vegetation Management
Summer is when your system produces the most energy — and when problems become most costly. A panel that's underperforming in January costs you $5-10/month. The same panel in July costs you $30-50/month. Monitoring matters most during peak production months.
Monitor your inverter display weekly. Most modern inverters show daily and cumulative production. Compare your daily output to the PVWatts estimate for your system size and location. If you're consistently 10%+ below estimate, investigate. The most common summer issues are: inverter overheating (ensure adequate ventilation around the unit), tree shading from spring growth, and dust accumulation from dry conditions. Track how maintenance impacts your overall solar savings.
Trim nearby trees. A tree that was clear of your panels in March may be casting shade by July. Trim branches that overhang or come within 6 feet of your panels. Even partial shading during peak sun hours (10 AM - 3 PM) significantly impacts production.
Fall: Preparing for Shorter Days and Angle Changes
As the sun's angle drops, your panels receive less direct radiation. This is normal and expected — but it's also the time to prepare for winter challenges.
Remove fallen leaves and debris. Leaves accumulate on panel edges and between rows, creating shade pockets and trapping moisture. Wet leaves decompose and leave an organic film that's harder to clean once it dries. Clear panels monthly during peak leaf-fall season.
Check and test your monitoring system. If your system has app-based monitoring (Enlighten for Enphase, Tesla app, etc.), verify that all panels are reporting data. A panel that stops reporting may have a microinverter or optimizer failure that should be addressed before winter makes roof access dangerous.
Inspect seals and flashings. Fall is the best time to check the waterproof seals around your panel mounting points. Look for cracked sealant, lifted flashings, or signs of water intrusion in your attic directly below the panel array. Addressing these issues before winter rains prevents costly roof damage.
Winter: Snow, Ice, and Reduced Production
Winter production drops are normal — shorter days and lower sun angles mean 30-50% less output compared to summer. But snow management and ice prevention are still important.
Snow removal: Solar panels are slippery, and snow typically slides off on its own within 1-3 days. If you need to speed up the process, use a foam snow rake from ground level. Never use metal tools or climb onto a snow-covered roof. The Department of Energy notes that the financial loss from a few snow-covered days is typically less than the risk and cost of improper snow removal.
Ice dams: If ice forms along the bottom edge of your panels, it's usually because snow is melting on the panels (which are warmed by sunlight) and refreezing at the colder edge. This is normal and doesn't damage panels. However, persistent ice dams on your roof below the panels can cause water backup — address those with proper attic insulation and ventilation.
Inverter and Battery Maintenance (If Applicable)
The inverter is the most failure-prone component in a solar system. Unlike panels (25-year lifespan), string inverters typically last 10-15 years, while microinverters last 20-25 years.
Quarterly inverter check: Listen for unusual buzzing or clicking sounds. Check the display for error codes. Ensure the area around the inverter has at least 6 inches of clearance on all sides for ventilation. Inverters generate heat during operation and need adequate airflow. A clogged inverter fan or dusty heat sink reduces efficiency and shortens lifespan.
Battery maintenance (if you have storage): Lithium-ion batteries like the Tesla Powerwall require minimal maintenance. Just ensure the unit's ventilation openings aren't blocked, the firmware is updated (most update automatically), and the ambient temperature stays within the manufacturer's range (typically 32°F-120°F). Check battery health in your monitoring app quarterly — capacity should remain above 90% for the first 5 years. For a deeper look at battery economics, see my solar battery savings guide.
When to Call a Professional Solar Technician
Most maintenance tasks are DIY-friendly, but some situations require a licensed solar professional:
- Visible panel damage: Cracked glass, delamination (bubbling appearance), or burn marks indicate cell damage. A technician can test the affected panel's output and arrange a warranty replacement if needed.
- Consistent production drop across all panels: If your system suddenly produces 20%+ below estimate across the entire array, the issue may be with the main inverter, a blown fuse, or a wiring problem — all of which require professional diagnosis.
- Roof leaks near panel mounts: Water intrusion at mounting points is a serious issue that needs resealing by a qualified installer. Don't attempt DIY repairs on roof penetrations — improper sealing voids your roof warranty.
- Inverter replacement: When your inverter reaches 10-12 years of age, proactively schedule a replacement rather than waiting for failure. A planned replacement during good weather is far less disruptive than an emergency repair.
A professional solar inspection typically costs $150-$300 and is worth scheduling every 3-5 years, even if your system appears to be functioning normally. The technician will test panel voltages, check wiring connections, verify grounding, and assess the overall system health — catching small issues before they become expensive problems.
💡 Key Insight
Well-maintained solar panels degrade at just 0.5% per year. Poorly maintained panels can degrade at 1-1.5% per year due to moisture intrusion, UV damage to degraded seals, and thermal stress from dirt-covered hot spots. Over 25 years, that difference is 12.5% vs. 25-37.5% total output loss — a difference worth thousands of dollars.